Blog

Auto Lift Guides

Plan the Whole Transmission-Service Bay Before Ordering a Lift

By Olympic Equipment

Start with the handoff between people and equipment

A transmission-service bay is a project involving more than a lift purchase. The owner chooses the work the bay must support. A supplier checks equipment applications. An installer evaluates the installation. Someone coordinates delivery, utilities and the transfer back to the shop. A useful purchasing file connects those decisions so that an unanswered question does not disappear between conversations.

Begin with a one-page description of the intended bay. Name the work being evaluated, the vehicles involved and the equipment already in place. Separate routine underbody access from work involving component removal. These categories help frame the supplier discussion; they do not establish an approved lifting procedure. Ask the people responsible for the work to describe what they need to reach and where other equipment must move.

Make the job list specific enough to review

Rather than writing “transmission work,” list the tasks the shop actually intends to offer. For each task, record whether the current proposal addresses it, what additional equipment is being considered and which application questions remain open. Add a place for the supplier's written response. A list of unanswered questions is more useful than a shopping list that implies every item already works together.

For example, a planning worksheet might include an underbody inspection, a fluid-service task and a component-removal task. This is an illustrative categorization, not a claim that one lift or accessory arrangement can perform all three. Each row should lead to its own equipment and procedure review. Keep a task outside the proposal's agreed scope until that review is complete.

Include the actual vehicle range in the same file. Record identifying details and modifications, then obtain the information the equipment supplier requests for application review. Do not replace a list of vehicles with the name of the heaviest one. A purchasing decision should leave a clear record of which applications were checked and which still require investigation.

Match the documents to the proposed equipment

The technical starting point is the current manual for the exact equipment. Olympic's manual directory provides model-specific documents. The linked 2PCFXL-10 installation and operation manual, for example, has separate sections for site layout, concrete, power, installation and operation. Those headings are a useful reminder to request a complete review. They are not specifications for a different lift. [1, 2]

Save the manual's filename, the model it covers and the date it was obtained. Ask the supplier to resolve any mismatch between a quotation, a model label and a document before treating the file as authoritative. Add separate documentation for each proposed accessory. Keep older versions in an archive clearly separated from the working set so that a forwarded email does not quietly revive a superseded proposal.

Sketch the paths, not just the footprint

Draw the proposed bay with the lift footprint, doors, controls, fixed storage and the routes used to bring equipment to the work area. Mark uncertain dimensions as unverified. A floor-plan discussion can then identify who needs to measure or confirm each item, rather than letting a neat drawing suggest that the site has already passed review.

Use a tabletop walkthrough with the people who will use the bay. Ask where equipment is stored, how it reaches the work position and what must be moved before and after a job. Record conflicts as questions for the designer, installer or supplier. The exercise is for identifying issues; it does not approve clearances or authorize a repair method.

Give every installation question an owner

Use a readiness register with five fields: question, responsible person, evidence needed, due date and status. “Floor information missing” should have an assigned next action, not simply a red highlight. The owner might need to locate building records or arrange an assessment through the professional reviewing the installation. The register should say what evidence will close the issue.

Make delivery its own section. Ask who receives the shipment, who arranges unloading and who moves it to the bay. Request written confirmation of what freight, installation and utility work include. Put the carrier's arrival arrangements and the installer's appointment in the same schedule, while keeping the responsibilities distinct. A delivery date alone should not be treated as a ready-for-service date.

Create a separate entry for changes. If a different accessory or lift model is proposed, record which previous answers need to be checked again. A change in purchasing scope should travel back through the application and site-review questions, rather than appearing only on the revised invoice.

Put the operating handover on the purchasing checklist

ALI advises matching the lift and accessories to the job, considering capacity, clearances and the vehicle manufacturer's lifting points, and obtaining training for the particular equipment. These are reasons to plan an operating handover before the bay is scheduled for work. [3]

Ask who will provide the required instruction, which operators will attend and where the equipment documents will be kept. Prepare a place to record training and the remaining questions that arise during handover. The purchasing coordinator can organize these records without claiming to certify the installation or the operators.

The handover file should identify the route for reporting a problem and obtaining qualified service. Keep equipment identity, supplier and service contacts together. The goal is practical continuity: the person managing the next issue should not have to reconstruct the entire purchase from scattered messages.

Close the project with evidence

Before closing the purchasing project, compare the delivered equipment and agreed scope with the final quotation. Confirm that the responsible parties have supplied their completion records and that unresolved items remain visible. File the final manuals, application responses, installation records and operating information in one accessible location.

A project closeout meeting can be brief. Review what was purchased, which work was evaluated, who completed each part and what remains outside the approved scope. Do not turn a ticked checklist into a technical approval. Use it to locate the actual evidence and the people responsible for it. That creates a useful starting point when the vehicle mix, equipment or planned work changes later.

Sources and publication note

[1] https://www.olympic-equipment.com/pages/manuals

[2] https://cdn.shopify.com/s/files/1/0939/2511/4137/files/2PCFXL-10-Operating-Installation-Guide.pdf?v=1746723048

[3] https://www.autolift.org/be-a-smart-auto-lift-user/

Published by Olympic Equipment on October 22, 2026. Olympic Equipment sells lifts and accessories. This AI-assisted educational article expands topics in the company’s previously published guides. It presents planning and recordkeeping suggestions; follow the exact manufacturer instructions and obtain application and site decisions from the responsible qualified professionals. No product compatibility, certification, installation approval or firsthand customer result is claimed.

Related original company guide: https://olympicequipmentguides.blogspot.com/2026/10/blog-post.html

Republished by Olympic Equipment for Motorcar Magazine. Earlier Motorcar WordPress edition. Any original-publication credit above is retained. Explore the auto lift video library for related planning topics.

Auto Lift Guides

How to Choose Between a Two-Post and Four-Post Lift

Published by Olympic Equipment

Choose the lift around the work you need to do, the vehicles you own, and the space available. Capacity is one part of the decision.

Begin with your three most common tasks

Write down the jobs that matter most. A collector who wants stacked parking has a different priority from a mechanic doing brake and suspension work every day. An occasional oil change should not outweigh a storage requirement that affects the garage year-round.

Rank those tasks before comparing models. That gives the conversation with your supplier a clear starting point and makes it easier to recognize which accessories are essential.

Compare how each design supports a vehicle

A conventional two-post lift uses arms and adapters at the vehicle’s approved lifting points, leaving the wheels available for service when the vehicle is correctly positioned. A conventional four-post lift supports the tires on runways, making it a natural option to evaluate for drive-on parking and underbody access.

Wheels-off service on a four-post lift requires suitable approved equipment, such as compatible bridge jacks. Olympic’s two-post versus four-post comparison explains the main differences.

Check the vehicles beyond their weight

Create a vehicle list with operating weight, wheelbase, width, length, and any modifications. Ask how the proposed equipment accommodates the entire range. For a two-post design, discuss arm reach, adapters, approved lifting points, and vehicle balance. For a four-post design, discuss runway dimensions, wheelbase fit, approach, and parking clearances.

A higher capacity label does not, by itself, establish compatibility. Ask the supplier to explain the exact match for your vehicles and intended work.

Compare the usable garage layout

Sketch each candidate lift into the same floor plan. Include overhead obstructions, doors, ramps, walking space, tool storage, and the location of the controls. Check the model-specific foundation and utility requirements. For stacked parking, evaluate both vehicles and the chosen locking height.

Do not assume every four-post model can remain unanchored or use a caster kit. Those options depend on the equipment and installation conditions. Likewise, a two-post lift needs the documented foundation and installation arrangement for that model.

Price the complete setup

Request a written comparison that includes the lift, necessary adapters or jacks, freight and unloading arrangements, installation, utility work, and any building changes. Ask which services are included and which are separate. A more useful comparison is “ready for the work I need” than “lowest equipment price.”

For mixed needs, make a simple decision sheet: task, frequency, required accessory, and verified fit. Choose after the important questions have written answers.

Compare your options: Explore Olympic two-post lifts and four-post lifts, then call 866-774-4531 with your vehicle list and garage measurements.

References: Olympic Equipment’s lift comparison, model manuals, and product collections. Verify the selected model’s documentation before purchase or installation.

Originally published on Olympic Equipment Auto Lift Guides. Company-authored educational content.

Company disclosure: Olympic Equipment sells automotive lifts and shop equipment and has a commercial interest in equipment purchases. This educational content was prepared with AI assistance. It supports planning discussions with qualified professionals and does not replace the applicable manufacturer instructions or operator training.

Republished by Olympic Equipment for Motorcar Magazine. Earlier Motorcar WordPress edition. Any original-publication credit above is retained. Explore the auto lift video library for related planning topics.

Auto Lift Guides

How to Remove Wheels When Using a Four-Post Lift

Published by Olympic Equipment

Yes—an appropriately equipped four-post lift can support wheels-off work. The usual solution is a compatible, properly rated bridge jack that lifts the vehicle clear of the runways.

Understand why the runways alone are not enough

On a standard drive-on four-post lift, the tires carry the vehicle’s weight on the runways. Raising the main lift raises the tires with it. A separate approved lifting device is needed to transfer the relevant load away from the wheels so wheel service can take place.

A bridge jack is designed for this role on compatible equipment. Olympic’s bridge jack collection includes different designs and capacities. Choosing one requires more than matching a product’s headline weight rating.

Confirm the complete equipment combination

Have the lift and accessory supplier verify the exact lift model, jack model, mounting arrangement, adjustment range, lifting-point reach, and vehicle application. The jack’s capacity is separate from the main lift’s capacity. Do not assume each axle carries half the vehicle’s weight or that two jack ratings can simply be added to approve a job.

If a lift is ALI certified, confirm the accessory is approved for that exact certified configuration. The Automotive Lift Institute explains that adding an unrecognized accessory can invalidate the configuration’s certification while it remains altered.

Plan around the actual repair

Tell the supplier whether you want to remove wheels at one end of the vehicle or perform work that leaves more wheels unsupported. Different jobs can require a different approved arrangement. Bring the vehicle details and the intended task to that conversation before buying accessories.

Ask about ground clearance, the vehicle manufacturer’s lifting points, adapter selection, jack travel, and any air supply requirements. A jack that fits between the runways still needs to suit the vehicle and work being performed.

Use the model’s operating procedure

A trained operator must follow the manuals for the lift, bridge jack, and vehicle. Those instructions govern positioning, wheel restraint, lifting-point contact, load limits, mechanical support, and lowering. Use the required load-holding devices; hydraulic pressure alone is not a substitute for the prescribed support.

This article explains the equipment choice, rather than providing a universal wheel-removal sequence. Do not improvise with blocks, unsecured stands, or an ordinary jack placed on a runway unless the manufacturers specifically approve the arrangement.

Consider how often you do wheels-off work

A compatible bridge jack can add useful service capability to a four-post setup. If brakes and suspension are your primary work, compare that complete setup with a suitable two-post lift before deciding.

Find the right combination: Ask Olympic Equipment to check your lift, vehicle, and intended repair. Have the lift model and serial information available, or call 866-774-4531.

References: Olympic Equipment’s bridge jack collection; ALI’s certification and accessory FAQ; ALI’s operating guidance. Use the current instructions for the exact equipment.

Originally published on Olympic Equipment Auto Lift Guides. Company-authored educational content.

Company disclosure: Olympic Equipment sells automotive lifts and shop equipment and has a commercial interest in equipment purchases. This educational content was prepared with AI assistance. It supports planning discussions with qualified professionals and does not replace the applicable manufacturer instructions or operator training.

Republished by Olympic Equipment for Motorcar Magazine. Earlier Motorcar WordPress edition. Any original-publication credit above is retained. Explore the auto lift video library for related planning topics.
Auto Lift Guides

How to Check Concrete Requirements Before Choosing a Car Lift

Published by Olympic Equipment

Start with the requirements for the exact lift model and verified information about the floor. A concrete thickness repeated online cannot approve your installation.

Gather the two sides of the comparison

Make a project folder with the lift manual on one side and the building’s slab records on the other. The decision depends on how those requirements and actual conditions match. If the documentation is missing, label it as missing so the installer can help identify the next step.

Olympic’s car lift concrete requirements guide identifies the main considerations: thickness, concrete strength, reinforcement, condition, anchor layout, and distances from edges or joints. Those factors must be assessed together.

Ask specific questions about the floor

A useful first message to the installer is: “Here is the lift model, here are the slab records I have, and here is what I cannot verify.” Include photographs and a sketch of the intended column locations. Mark visible cracks, joints, drains, repairs, and slab edges without deciding yourself that they are acceptable.

The information sheet can use three statuses: documented, needs professional verification, and not applicable to the selected design. This prevents an assumed answer from becoming part of the installation plan.

Treat an unknown slab as a question to resolve

The installer or a qualified structural professional may recommend records review, scanning, testing, or another assessment suited to the site. Do not drill exploratory holes yourself to guess thickness or locate buried systems.

Post-tensioned construction deserves particular attention because drilling can damage stressed cables. Embedded heating, electrical runs, or other services must also be identified before drilling. Ask the professionals reviewing the site how they will resolve these issues.

Coordinate new concrete before the pour

For a new garage or a planned foundation modification, provide the selected lift’s current drawings to the people designing the work before construction begins. Confirm who is responsible for the design, approvals, concrete documentation, and readiness for installation.

A general contractor’s description of “a heavy-duty slab” is not a substitute for the actual information required by the lift manufacturer. Keep the final plans and installation records with the equipment manual.

Resolve the foundation before committing to a layout

A lift that suits your vehicle may still require a different position or foundation work. Portable or unanchored designs also need a suitable supporting surface and must meet their own documented conditions; portability does not eliminate the floor review.

Have floor questions? Find your model in Olympic Equipment’s manual collection, then contact the team with your slab information and proposed layout.

References: Olympic Equipment’s concrete requirements guide and model manuals, linked above. This article helps organize a site review; it does not certify a slab or specify a foundation design.

Originally published on Olympic Equipment Auto Lift Guides. Company-authored educational content.

Company disclosure: Olympic Equipment sells automotive lifts and shop equipment and has a commercial interest in equipment purchases. This educational content was prepared with AI assistance. It supports planning discussions with qualified professionals and does not replace the applicable manufacturer instructions or operator training.

Republished by Olympic Equipment for Motorcar Magazine. Earlier Motorcar WordPress edition. Any original-publication credit above is retained. Explore the auto lift video library for related planning topics.

Auto Lift Guides

How to Prepare for a Professional Auto Lift Installation

Published by Olympic Equipment

A smoother installation starts with a clear plan for the building, delivery, electrical work, and the responsibilities of everyone involved.

Confirm the model and intended work

Write down the exact lift model, selected accessories, vehicles, and intended use before scheduling. “A four-post lift for my truck” leaves important questions open. Storage, underbody service, and wheels-free repairs can require different equipment and preparation.

Keep the current installation manual and dimension drawing with the project information. Olympic provides model-specific operating and installation manuals. Confirm that the document matches the equipment being delivered.

Get the site questions resolved first

Have the proposed location reviewed for overhead space, working clearances, floor condition, and the model’s foundation requirements. Ask who will confirm the slab information and who will arrange any needed investigation. Flag unknowns early, especially if the floor has cracks, previous repairs, embedded utilities, or an uncertain construction history.

Electrical planning should use the selected power unit’s documented requirements. Arrange qualified electrical work and any applicable permits rather than assuming an existing outlet will be suitable. If an accessory needs compressed air, include that in the preparation discussion.

Make delivery and unloading a separate conversation

Ask how the equipment will arrive, who receives it, what unloading equipment is needed, and how the package reaches the installation bay. Do not assume delivery includes unloading or installation. Confirm each service in the written quote.

Share access details such as a narrow driveway, sloping entrance, restricted gate, or limited unloading area. Give the delivery contact and installation contact each other’s information when appropriate so responsibilities are clear.

Agree on the installation scope

Before the appointment, ask for a list of what is included and what must be completed separately. Your questions can cover equipment assembly, anchoring where required, fluid, utility connections, setup checks, packaging removal, and operator orientation. Ask what happens if the crew finds an unsuitable site condition.

Create a short readiness sheet with four columns: item, responsible person, completion date, and remaining question. This is particularly useful when a building contractor, electrician, delivery carrier, and installer are all involved.

Leave time for the handover

Keep the bay clear and make sure the person who will operate the lift is available for orientation. The Automotive Lift Institute emphasizes training on the specific equipment and following its instructions. Ask the installer to identify the operating controls, load-holding devices, inspection points, and maintenance information before the lift enters service.

Planning an installation? Review Olympic Equipment’s installation information, then request a quote for your model and location. Call 866-774-4531 with your site details.

References: Olympic Equipment’s manuals and installation information, linked above; Automotive Lift Institute guidance on training and operation. This preparation checklist does not replace installation instructions.

Originally published on Olympic Equipment Auto Lift Guides. Company-authored educational content.

Company disclosure: Olympic Equipment sells automotive lifts and shop equipment and has a commercial interest in equipment purchases. This educational content was prepared with AI assistance. It supports planning discussions with qualified professionals and does not replace the applicable manufacturer instructions or operator training.

Republished by Olympic Equipment for Motorcar Magazine. Earlier Motorcar WordPress edition. Any original-publication credit above is retained. Explore the auto lift video library for related planning topics.
Auto Lift Guides

How to Measure Your Garage Before Buying an Auto Lift

Published by Olympic Equipment

Measure the space your lift and vehicle will actually occupy, including the path of the garage door. A room’s advertised ceiling height is only the starting point.

Start with a simple garage sketch

Draw the walls, garage entrance, windows, workbench, cabinets, and the bay where you want the lift. Put each measurement on that sketch instead of keeping separate numbers in a phone note. This makes it easier to explain the project when you request a fit review.

Photograph the proposed bay from the entrance and both rear corners. Include a view toward the ceiling. If a measurement is uncertain, mark it as unverified rather than estimating.

Measure the lowest overhead obstruction

Check for door tracks, opener rails, beams, lights, ducts, and anything else below the ceiling. Measure the available clear height at several points across the intended lift location. Open the garage door and record where it travels; the door’s movement can affect an otherwise promising layout.

For stacked parking, the chosen locking position must provide enough room for the lower vehicle, the lift structure, and the upper vehicle, with the required clearance overhead. Use the exact model drawing. Olympic’s four-post lift garage-height guide explains the dimensions to compare.

Record usable width and depth

Measure the proposed bay between actual obstructions, not just wall to wall. Think through how you will enter the garage, position the vehicle, open its doors, reach tools, and walk around the equipment. Include the space required for approach ramps and the operating controls.

A useful planning exercise is to mark the proposed footprint with removable tape. Walk through a normal workday: bring in a tool cart, open the storage cabinet, and stand where you would work. This can reveal a layout problem before equipment arrives. It does not replace the manufacturer’s required clearances.

Measure the vehicles too

Prepare a list for every vehicle you expect to lift: year, make, model, actual operating weight, wheelbase, overall length, width, and height. Include roof accessories or modifications. For two-post equipment, the vehicle’s approved lifting points and the lift’s arm geometry also matter.

Send one complete information package

Combine the sketch, photographs, vehicle list, intended use, and your ZIP code. Say whether your main goal is storage, routine maintenance, or frequent wheels-off repairs. You can compare those uses in Olympic’s two-post and four-post lift guide.

Ready for a fit review? Send your measurements to Olympic Equipment or call 866-774-4531. Confirm the exact model and site requirements before ordering.

Reference: Olympic Equipment’s garage-height and lift-type guides, linked above. This article is a planning aid; the current model manual and site review govern installation.

Originally published on Olympic Equipment Auto Lift Guides. Company-authored educational content.

Company disclosure: Olympic Equipment sells automotive lifts and shop equipment and has a commercial interest in equipment purchases. This educational content was prepared with AI assistance. It supports planning discussions with qualified professionals and does not replace the applicable manufacturer instructions or operator training.

Republished by Olympic Equipment for Motorcar Magazine. Earlier Motorcar WordPress edition. Any original-publication credit above is retained. Explore the auto lift video library for related planning topics.

Uncategorized

Living on the Wild Side


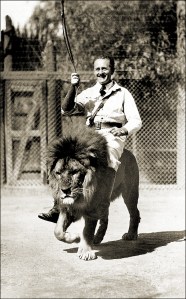
Our grandparents certainly had a different approach to parenting! Looking back, it’s funny to think that our parents actually allowed us to do some wild things. Remember the time you went fishing with grandpa and caught an alligator? It was pretty crazy, but no one seemed surprised by it.


Grandma even let you keep the alligator as a pet, much to your delight!

These days, just seeing someone walking around with an alligator would definitely turn some heads! But while safety might have been less of a concern for our grandparents’ generation, we wouldn’t change it for anything. In hindsight, it was those wild moments that taught us important life lessons and made us into who we are today. Cheers to our adventurous grandparents who let us do all the crazy things!

And let’s not forget the classic “riding in the back of a pick-up truck” experience. Our grandmas would get onto us for not wearing seatbelts, but boy did we love feeling the wind through our hair! Nowadays, safety is top priority so our kids can only imagine what it was like to have no rules or regulations. Sure, life may have been less safe then, but it was filled with memories and experiences that will last forever.

So, here’s to our grandparents who let us do all the crazy things! We thank you for teaching us valuable lessons and allowing us to live life on the wild side, and now looking back we wouldn’t change a thing because that is what made us who we are today!


Classic Cars, Pickups & SUVs

Early Racing and Auto Enthusiasts

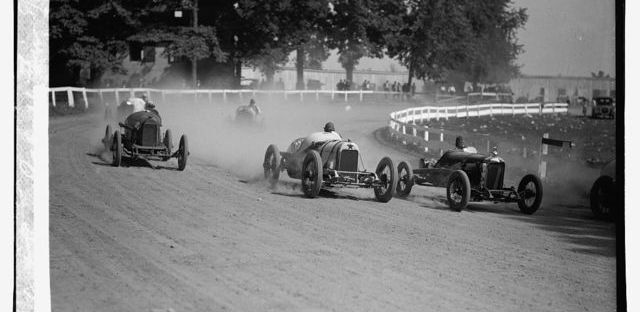
Racing in the early 1900s was an entirely different experience to what we know today. Not only were the tracks dirt, there were also virtually no safety measures in place; racers had nothing but their skill and bravery as protection from harm.

It wasn’t until after World War I that tracks began being paved with concrete, marking the dawn of a new era in racing. Not only did this provide much smoother and faster courses, but it also allowed for stricter safety regulations to be enforced. Drivers were now required to wear helmets and fire-resistant suits and have roll bars installed in their cars – measures that had previously been unheard of on dirt tracks.

The shift from dirt tracks to concrete was not just an improvement in safety, but also a testament to the ever-evolving nature of motorsport. Even today, advances in technology continue to lead the way for improved performance levels and additional race safety requirements being mandated.

Despite the changes over time, one thing remains true: Racing has always been – and always will be – thrilling and exciting, regardless of which type of surface the race takes place on. To experience the thrill of racing is something that can never be taken away – no matter how many safety measures are implemented!

So, if you’re feeling enough to tackle an old-fashioned dirt track or modern concrete course, strap in get ready for one wild ride And please keep in mind your helmet. No matter what surface you choose, safety should always come first. Happy racing!

Reviews, Sports Car

Henry Ford’s fight for Hemp Fuel

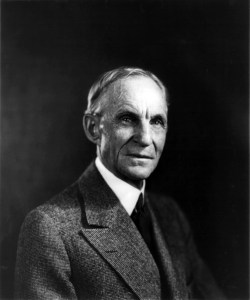
In 1941, Henry Ford unveiled a car made partly of hemp and powered by hemp fuel. Unfortunately, this project was short-lived due to the criminalization of hemp in the United States as part of the Marijuana Tax Act of 1937. This effectively brought an end to any research or development on using industrial hemp as a potential automotive fuel source. As a result, hemp fuel was unable to be explored further.

Today, advances in technology and research have identified other potential healthy fuels such as soy bean oil that can provide clean burning energy for cars and trucks. While these new fuel sources are still being researched and developed, they offer an alternative way to reduce our carbon footprints on the environment. As we continue to look for ways to make our transportation more sustainable, these healthy fuels may become viable options.

By researching and implementing these healthier fuels into our transport systems, we can both help protect our planet from greenhouse emissions while also helping to create a more efficient system of powering the vehicles we need to function. With enough research, we may be able to discover the key to developing a viable hemp fuel source, allowing us to build upon the legacy of Henry Ford. With enough effort and dedication, we may be able to unlock the potential of this eco-friendly fuel source and create a healthier world for all.

The aftermath of Henry Ford’s failed attempt with hemp fuel is still felt today, as many researchers are interested in finding ways to use industrial hemp as an automotive fuel source. While hemp was criminalized in 1937 due to the Marijuana Tax Act, it has been found that certain byproducts from the plant can be used in the production of biofuels such as biodiesel and ethanol. Hemp seed oil is also being explored as a viable alternative for powering cars and trucks.

The potential of hemp fuel as an automotive fuel source is still being researched and developed, but many believe that it could be a powerful tool for reducing our collective carbon footprint. Hemp-based fuels offer the possibility of emissions reductions when compared to traditional petroleum-based fuels due to their high-energy content and low levels of sulfur dioxide, which can contribute significantly to air pollution.

While the development of these healthier alternative fuels has a long way to go until they are widely adopted by the public, research and development in this area continues to progress. More efficient production methods are being explored, and new applications are being tested, such as powering tractors with hemp biodiesel or even using hemp biofuel in airplanes.

Overall, while Henry Ford’s hemp fuel car was not a success, the potential of industrial hemp as an automotive fuel source is still being explored today. With enough dedication and research, we may be able to unlock the potential of this eco-friendly fuel source and create a healthier world for all.
Oftentimes when people consider ford’s hemp-based vehicle, they tend to overlook how far research on its use as a fuel has come recently. In addition to the promise of emissions reductions that using this type of fuel can offer, there are many other benefits to using hemp biofuels such as increased energy efficiency, reduced dependence on fossil fuels, cost savings and new income sources from growing hemp crops.